Hello everyone! Welcome back to my blog!
This week I decided to customize a tote bag I've had lying around for awhile now. I got it in one of my art courses at my university to hold all of my art supplies, and I meant to decorate it during that class, but I never got around to it. I finally decided to commit and make it personalized to me!
I wanted to use paint and embroidery to create the designs on the bag. Some designs are purely paint, some purely embroidery, and some a combination of the two. I had a lot of fun designing and picking symbols to put on my bag. I wanted it to display all of the things I love or have a passion for.
Keep reading to see the designs on my bag and how I made them! I'll explain the designs in more detail at the end, where you can see them all clearly.
Step 1
The tote bag was originally plain on both sides. The first thing I did was make a list of different symbols I thought I would like on my bag. These included images that represented my favorite TV shows, my favorite books, my favorite movies, and my hobbies. Then I printed out the symbols for reference so I could draw them on the bag.
 |
| Before decoration! |
 |
| Printed references! |
Step 2
Then I used the references to start sketching my ideas onto the tote bag. I placed the designs at random intervals all over the bag and tilted at angles to give a more random appearance. I quickly realized I had to be careful with my sketches, because it was difficult to erase if I made a mistake. Paint would cover some of the mistakes, but I didn't want to risk making mistakes in the first place, so I took a lot of time drawing the designs to make them perfect.
 |
| Sketching! |
 |
| Sketching! |
 |
| Finished Side 1! |
 |
| Finished Side 2! |
Step 3
Once I was pleased with the designs, I used acrylic paint to decorate the designs. This step took a long time, because the paint does not spread well on the canvas material of the bag. I had to re-dip into the paint constantly, and since the weaving is more sparse on canvas, it took a lot of paint to create an opaque layer.
Step 4
Once the paint was dried, I started to add embroidery details. This part also took a lot longer than I anticipated. I used a backstitch for everything, which turned out to be pretty tedious. This took me hours, but it was so worth it. Once I was finished with the embroidery, the bag was finished!
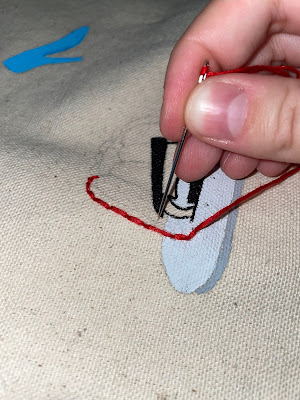 |
| Starting to embroider! |
 |
Detailing!
|
 |
| Detailing! |
 |
| Detailing! |
Step 5
The end! I am so so pleased with how this bag turned out. I was able to incorporate a lot of different topics that represent all of the things I love, and since I made it, that makes it extra special to me.
 |
| Finished Side 1! |
 |
| Finished Side 2! |
Here's a more detailed list of the designs and what they represent:
Side 1
- Sun: Tangled (Disney movie)
- Glass Slipper: Cinderella (Disney movie)
- Stapler in Jell-O: The Office (TV show)
- Frame: Friends (TV show)
- Medallion: Hercules (Disney Movie)
- Angelic Rune: The Shadowhunter Chronicles (Book series)
- Bow and Arrow: Apollo (Greek God)
- Magic Lamp: Aladdin (Disney movie)
- Battle Axe: How to Train Your Dragon (DreamWorks film series)
Side 2
- Mask: Phantom of the Opera (Musical)
- Red Umbrella: Friends (TV show)
- Yankees Cap: Percy Jackson and the Olympians (Book series)
- Crown: Sleeping Beauty (Disney movie)
- Elements: Avatar: The Last Airbender (TV show)
- Lyre: Apollo (Greek God)
- Flower Necklace: Avatar: The Last Airbender (TV show)
- Trident: Percy Jackson and the Olympians (Book series)
- Horn: Minnesota Vikings (Football team)
- Mug: The Office (TV show)
These are some of my favorite symbols that represent the things I love. I think people who look at the bag can get a sense of what fandoms I'm in and what my passions and hobbies are. I really love how the bag turned out. I think my favorite symbol on the entire bag is the Elements design from Avatar: The Last Airbender. It turned out so cool!
Thank you for following along!
Have a fantastic day!


Comments
Post a Comment